Adelaide CS Community Project
When I first knew Garbage Collection Mechanism in Java, I felt it was quite appealing to me, especially for a C++ programmer, because I do not need to worry about the memory leak anymore; therefore I started learning Java in April 2022. On December 22, 2022, I started my Java full-stack project. This post will keep track of my progress of developing this project.
2023-02-19
Introduction to Elasticsearch
- Elasticsearch is a distributed, free and open search and analytics engine for all types of data, including textual, numerical, geospatial, structured, and unstructured. Elasticsearch is built on Apache Lucene and was first released in 2010 by Elasticsearch N.V. (now known as Elastic).
- Elasticsearch Keywords
- Index: equals to a table of database
- Document: equals to one row of data (json format)
- Field: equals to one column type of table
- Cluster: one or more server
- Node: one server of the cluster
- Slice: segment of an index
- Copy: back-up for slices (one slice can have many copies)
- Install Elasticsearch
- brew install elastic/tap/elasticsearch-full
- Check the status of cluster
- curl -X GET “localhost:9200/_cat/health?v”
- Check the number of index
- curl -X GET “localhost:9200/_cat/indices?v”
- Create an index
- curl -X PUT “localhost:9200/test”
- Detele an index
- curl -X DELETE “localhost:9200/test”
2023-02-18
Displaying specific system notifications
- Get all notifications of a specific topic
- Display the total number of unread messages using interceptor (messages + notifications)
2023-02-17
Displaying system notifications
- Display three types of system notifications: comment, up-vote, and follow.
- Count the number of unread messages
- Implementation
- Get the latest notification for one topic
- Get the number of notifications for one topic
- Get the number of unread notifications for one topic
Trouble Shooting:
- Issue: ParseException: Exception evaluating SpringEL expression: “followNotice.message!=null”
- I spent around 2 hours in solving this bug. In my back-end implementation, if there is no following system notice, then an empty followNotice view object map will be added to the attribute of the template. Therefore, when the front-end trying to access followNotice.message, the issue will arise.
2023-02-16
Sending system notifications
- Trigger events: After commenting, up-voting, following
- Handle events: Encapsulate event objects, develop producer, develop consumer
- Invoke event producer in CommentController, LikeController, and FollowController
Trouble Shooting:
- Issue: IllegalArgumentException: XML fragments parsed from previous mappers already contains value for *
- I spent 2.5 hours on solving this issue. After some research, I know there are two ways of causing this issue:
- In the mapper file, there are duplicated method ids
- In the mapper file, method parameters are incorrect
- However, I checked these two rules for a while and did not find anything incorrect. And then, one post online said that in the extreme case, the problem of IDEA could cause this issue. Therefore, I cleaned and installed my maven project manually, and solved this bug in the end.
- I spent 2.5 hours on solving this issue. After some research, I know there are two ways of causing this issue:
2023-02-14
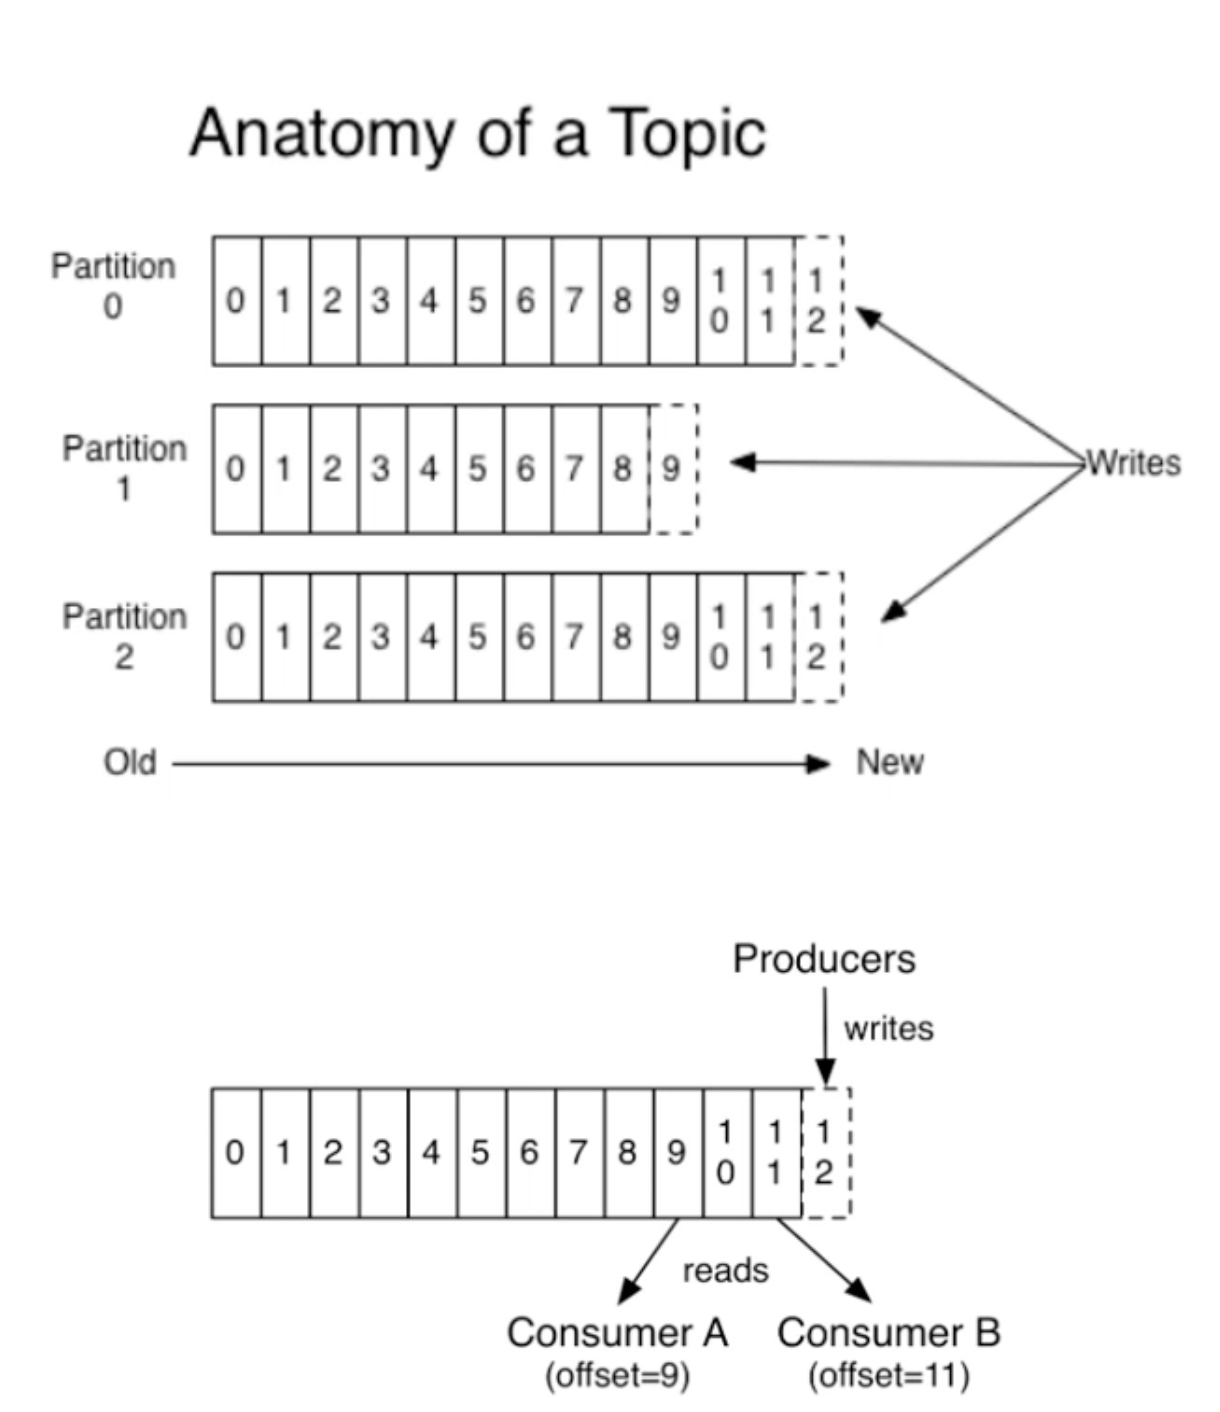
Kafka - Building terabyte-scale asynchronous messaging systems
- Kafka is a distributed streaming platform
- Applications: messaging systems, log collection, user behavior tracking, stream processing
- Features: high throughput, message persistence, high reliability, high scalability
- Kafka keywords
- Broker: Kafka server
- Zookeeper: An application to manage Kafka clusters
- Topic: The place where the producer puts the data in (A container for data)
- Partition: Segmentation for topic space (To boost concurrency capability)
- Offset: The index of a message in the partition
- Leader Replica: Main Back-up for data (When consumer requests for data, leader replica can respond)
- Follower Replica: Back-up for data (Just back-up)
- Install Kafka
- brew install kafka
- Start Zookeeper and Kafka
- zookeeper-server-start /usr/local/etc/kafka/zookeeper.properties
- kafka-server-start /usr/local/etc/kafka/server.properties
- Create a topic
- kafka-topics - -create - -bootstrap-server localhost:9092 - -replication-factor 1 - -partitions 1 - -topic test
- Check the list of topics at a specific server and port
- kafka-topics - -list - -bootstrap-server localhost:9092
- Put messages into Kafka
- kafka-console-producer - -broker-list localhost:9092 - -topic test
- After seeing >, we can put messages into Kafka
- Take messages from Kafka
- kafka-console-consumer - -bootstrap-server localhost:9092 - -topic test - -from-beginning
Introduction to blocking queue
- BlockingQueue
- Solving problems with threaded communication
- Blocking methods: put(), take()
- Producer-consumer mode
- Producer: thread that produces data
- Consumer: thread that consumes data
- Implementation class
- ArrayBlockingQueue
- LinkedBlockingQueue
- PriorityBlockingQueue, SynchronousQueue, DelayQueue
2023-02-11
Optimize login module
- Using redis to store captcha
- Reason
- Captcha requires constant access and refresh
- Captcha does not need to be stored permanently, it will expire after a short period of time
- There will be some problems about session sharing when it comes to distributed system
- Implementation
- Define redis key which consists of a random generated string called ‘captcha owner’
- Refactor method getKaptcha() from LoginController to store the generated captcha into redis
- Refactor method login() from LoginController to get the generated captcha from redis and verify it
- To get the redisKey, we will get the captcha owner from cookies
- Reason
- Using redis to store login session
- Reason
- We need to frequently check the login session every time when handling some requests
- Implementation
- Define redis key for login ticket
- Refactor method login() from UserService to store the login ticket into redis
- Refactor method logout() from UserService to destroy the login ticket when users log out
- Refactor method findLoginTicket() from UserService to get the login ticket from redis
- Reason
- Using redis to store the user information
- Reason
- We need to frequently check the user information based on the login session every time when handling some requests
- Logic
- Check if the data we want is stored in redis or not, if not, access database and store that data into redis
- Implementation
- Define 3 methods called getCache(), initCache(), clearCache()
- Put these 3 methods into other methods that will update the user information
- Reason
2023-02-02
Following list and follower list
- Go to FollowService
- Define a method called findFollowees() to get the followees of a user. (It contains the follower and the time of following)
- Define a method called findFollowers() to get the followers of a user.
- Go to FollowController
- Define a method called getFollowees()
- Check if the current logged in user has followed those followees or not.
- Define a method called getFollowers()
- Define a method called getFollowees()
- Connect with the frontend page
Trouble Shooting:
- Issue: The user profile page does not show the correct number of followees
- Cause: In the FollowService, I used RedisKeyUtil.getFollowerKey() instead of RedisKeyUtil.getFolloweeKey()
- Issue: In the followee list, I cannot unfollow users
- Solve: Add the label of input type=“hidden” id=“entityId” th:value="${map.user.id}" so that the javascript file can get the entityId
2023-01-31
Follower and following
- Define redis key
- A user follows: followee:userId:entityType -> zset(entityId, date)
- An entity being followed by: follower:entityType:entityId -> zset(userId, date)
- Define a service called FollowService
- Define a method called follow() by using transaction management
- Define a method called unFollow() by using transaction management
- Defind a controller called FollowController
- Define an asynchronous method called follow()
- Define an asynchronous method called unFollow()
- Define a method called findFolloweeCount() to count the followee for a user
- Define a method called findFollowerCount() to count the follower for a user
- Define a method called hasFollowed() to check if the user has followed the entity
- Modify the method getProfilePage() in the UserController to:
- Count the followee number
- Count the follower number
- Check if the user has followed the entity or not
- Connect with the frontend page
2023-01-27
Likes that I received
- Add a method for redis key
- Define a method called getUserLikeKey() to get the redis key for users (like:user:userId)
- Refactor the method like()
- Use transaction management to ensure the execution of 2 consecutive database operations
- Get entityLikeKey and userLikeKey
- Add a parameter called entityUserId into the function signature
- Check if the entity is liked or not
- put the code inside of operations.multi() and return operations.exec()
- Add / remove the user id to / from entityLikeKey
- Increment / decrement the variable userLikeKey
- Define a method called findUserLikeCount() to count the number of likes that a user received
- Type cast the Object type to Integer type
- Return the Integer if it is not a null. Otherwise, return 0
- Refactor likeController
- Modify the frontend (HTML, js) to pass the user id of the entity
Personal Profile
- Invoke the method getProfilePage() to pass the user and its count of likes received to the frontend profile page
- Modify the index and the profile pages
2023-01-20
Like
- Develop a utility for redis key
- Define a method to get the key for entities that are up voted (format: like:entity:entityType:entityId)
- Develop a service for redis key
- Define a method called ’like()’ to let the user up vote
- If the user has liked the post before, remove the user id from the set.
- Else add the user id into the set.
- Define a method called ‘findEntityLikeCount()’ to count the number of likes that an entity receives
- Define a method called ‘findEntityLikeStatus()’ to check if the user liked the entity before or not
- Define a method called ’like()’ to let the user up vote
- Develop a controller for ’like’
- Invoke the method called ’like()’ to let the user like the post
- Invoke the method called ‘findEntityLikeCount()’ to count the number of likes that an entity receives
- Invoke the method called ‘findEntityLikeStatus()’ to check if the user liked the entity before or not
- Send back the JSON format of these information
- Connect with frontend pages
2023-01-19
Integrating Redis with Spring
- Load spring-boot-starter-data-redis from Maven Repository
- Configure for Redis
- Add configuration in application.properties
-
  spring.redis.database = 11
  spring.redis.host = localhost
  spring.redis.port = 6379
-
- Create a configuration file for Redis
-
  @Configuration
  public class RedisConfig {

      @Bean
      public RedisTemplate<String, Object> redisTemplate(RedisConnectionFactory factory) {
          RedisTemplate<String, Object> template = new RedisTemplate<>();
          template.setConnectionFactory(factory);

          // Specify a way for serialize
          // Key:
          template.setKeySerializer(RedisSerializer.string());
          // Value:
          template.setValueSerializer(RedisSerializer.json());
          // Hash:
          template.setHashKeySerializer(RedisSerializer.string());
          // Hash-Value:
          template.setHashValueSerializer(RedisSerializer.json());

          template.afterPropertiesSet();
          return template;
      }
  }
-
- Add configuration in application.properties
2023-01-18
Redis basis
- Redis is an in-memory data structure store, used as a distributed, in-memory key–value database, cache and message broker, with optional durability. Redis supports different kinds of abstract data structures, such as strings, lists, maps, sets, sorted sets, HyperLogLogs, bitmaps, streams, and spatial indices.
- Redis can be utilized for implementing cache, ranking list, counter, social networking, and message list.
- Redis persistence: Persistence refers to the writing of data to durable storage, such as a solid-state disk (SSD). Redis provides a range of persistence options. These include:
- RDB (Redis Database): RDB persistence performs point-in-time snapshots of your dataset at specified intervals.
- AOF (Append Only File): AOF persistence logs every write operation received by the server. These operations can then be replayed again at server startup, reconstructing the original dataset. Commands are logged using the same format as the Redis protocol itself.
- Commands for Database:
- Run Redis in the foreground: brew services start redis
- Connect to Redis: redis-cli
- Stop the service: brew services stop redis
- Select the Redis logical database: SELECT index
- Flush database: flushdb
- Get all keys of current logical database: keys *
- Get all keys with names starting with ’test’ of current logical database: keys test*
- Check the type of the key test:user: type test:user
- Check if the key test:user exists or not: exists test:user
- Delete the key test:user: del test:user
- Let the key test:students get expired after 10 seconds: expire test:students 10
- Commands for String Type:
- Set a pair of key and value: set test:count 1
- Get the value of a key: get test:count
- Increase the value of a key: incr test:count
- Decrease the value of a key: decr test:count
- Commands for Hash type:
- Set a pair of key and value for test:user: hset test:user id 1
- Get the key value of a pair for test:user: hget test:user id
- Commands for List type:
- Define a list test:ids and push some elements from the left: lpush test:ids 101 102 103
- Get the size of the list test:ids: llen test:ids
- Get the element of the list test:ids based on the index: lindex test:ids 0
- Get elements of the list test:ids based on the range: lrange test:ids 0 2
- Pop an element of the list test:ids from the right: rpop test:ids
- Commands for Set type:
- Define a set test:teachers and add some elements: sadd test:teachers Jason Kevin Joey Louis Bob
- Get the number of elements from the set test:teachers: scard test:teachers
- Randomly pop an element from the set test:teachers: spop test:teachers
- Check the remaining elements from the set test:teachers: smembers test:teachers
- Commands for Sorted Set:
- Define a sorted set and store elements and their weights: zadd test:students 10 aaa 20 bbb 30 ccc 40 ddd 50 eee
- Get the number of elements from the sorted set test:students: zcard test:students
- Get the weight of an element aaa from the sorted set test:students: zscore test:students aaa
- Get the ranking of an element ccc from the sorted set test:students: zrank test:students ccc
- The ranking is from small weights to big weights, starting from ranking 0.
- Get elements based on the the range of ranking from the sorted set test:students: zrange test:students 0 2
2023-01-17
Logging Information
- AOP (Aspect Oriented Programming): In computing, aspect-oriented programming (AOP) is a programming paradigm that aims to increase modularity by allowing the separation of cross-cutting concerns. It does so by adding behavior to existing code (an advice) without modifying the code itself, instead separately specifying which code is modified via a “pointcut” specification, such as “log all function calls when the function’s name begins with ‘set’”. This allows behaviors that are not central to the business logic (such as logging) to be added to a program without cluttering the code core to the functionality.
- Implementation of AOP:
- AspectJ: It expands Java, defines AOP syntax. AspectJ weaves code in the compiling stage to generate class files that follow the rule of Java byte code.
- Spring AOP: Spring AOP is purely based on Java. It weaves code in the running stage by the way of proxy (JDK dynamic proxy (by default), CGLib dynamic proxy). It only supports join points with method type.
2023-01-16
Handle exceptions
- We handle exceptions at the display layer by redirecting the user to some specific pages
- Make sure the error folder is under the templates folder and the name of those HTML files is XXX.html (XXX is the error code, e.g 404, 500)
- Make an folder called advice under the controller folder and define a class called ExceptionAdvice
// Handle exceptions for all classes with "Controller" annotation
@ControllerAdvice(annotations = Controller.class)
public class ExceptionAdvice {

    private static final Logger logger = (Logger) LoggerFactory.getLogger(ExceptionAdvice.class);

    @ExceptionHandler({Exception.class}) // Handle all exception classes
    public void handleException(Exception e, HttpServletRequest request, HttpServletResponse response) throws IOException {
        // Logging errors
        logger.error("500: " + e.getMessage());
        for (StackTraceElement element : e.getStackTrace()) {
            logger.error(element.toString());
        }

        // Check if it is an asynchronous request or not
        String xRequestedWith = request.getHeader("x-requested-with");
        if ("XMLHttpRequest".equals(xRequestedWith)) {
            // If it is an asynchronous request
            // Return a plain text for AJAX to convert it to JSON format
            response.setContentType("application/plain;charset=utf-8");
            PrintWriter writer = response.getWriter();
            writer.write(CommunityUtil.getJSONString(1, "Server Error!"));
        } else {
            // If it is a normal request
            // Redirect the user to error pages
            response.sendRedirect(request.getContextPath() + "/error");
        }
    }
}
2023-01-13
Send message
- Data Layer
- Insert a message
- Update message status (unread -> read)
- Service Layer
- Develop addMessage() method
- Filter HTML labels for safety concerns
- Filter sensitive words of the comment content
- Develop readMessage() method
- Invoke the method defined in the mapper file
- Develop addMessage() method
- Display Layer
- Develop asynchronous method sendMessage()
- Modify js file to send the message using AJAX
Read message
- Display Layer
- Define a method getMessageIds() to collect all message ids that need to be set to read status
- Pass into a message list
- Collect message ids if the current user is the receiver of the message and the message status is unread
- Invoke the method getMessageIds() inside of the method getMessageDetail()
- If the list collected is not empty, invoke readMessage() method to change the status of those messages
- Define a method getMessageIds() to collect all message ids that need to be set to read status
2023-01-12
Message List
- Data Layer
- Get the latest message for each conversation of the user
- Get the number of conversations of the user
- Get all messages of a particular conversation
- Get the number of messages of a particular conversation
- Get the number of unread messages (from a particular conversation or all conversations)
- Service Layer
- Use methods defined in the mapper file
- Display Layer
- Set page limit information
- Define a List<Map<String, Object» called conversations, each map inside contains:
- “conversation”: the latest message of one conversation
- “messageCount”: the number of messages of the conversation
- “unreadCount”: the number of unread message of the conversation
- “target”: another user of the conversation
- Get the total number of unread messages of all conversations
- Connect with the frontend page
Display specific message
- Display Layer
- Set page limit information
- Define a List<Map<String, Object» called messages, each map inside contains:
- “message”: a message of the conversation
- “fromUser”: the user entity who sent this message
- Get the target user of this conversation (relative to the user itself)
- Connect with the frontend page
2023-01-11
Add comments
- Data Layer
- Insert new comment into database
- Update the number of comments
- Service Layer
- Use transaction management to ensure two transactions (insert comment, update comment number) can success at the same time
- Insert the comment
- Filter HTML labels for safety concerns
- Filter sensitive words of the comment content
- Invoke the method from the mapper file to insert the comment
- Update the number of comments when the comment is made to a post
- Display Layer
- Set some attributes to the comment entity
- Invoke the method from the service file to insert the comment
- Redirect to the discuss detail page based on the id of the discuss post
2023-01-08
Display post comments
- Data Layer
- Based on the entity to fetch one page comments
- Based on the entity to fetch the total number of comments
- Service Layer
- Develop the service of handling fetched comments
- Develop the service of handling the number of fetched comments
- Display Layer
- Logic inside of the controller
- Define commentVoList to collect commentVo (view object, Map<String, Object>), it contains:
- “comment”: the content of the comment to the post
- “user”: the user who made this comment
- “replyCount”: the number of replies to this comment
- “replies”: replyVoList which collects replyVo (view object, Map<String, Object>), it contains:
- “reply”: the content of the reply to the comment
- “user”: the user who made this reply
- “target”: the target of this reply (reply to the post or reply to other users)
- Define commentVoList to collect commentVo (view object, Map<String, Object>), it contains:
- Display the post as well as its comments
- Logic inside of the controller
Trouble Shooting:
- Issue: java.sql.SQLSyntaxErrorException: You have an error in your SQL syntax; bad SQL grammar
- To address this issue, remember to put a comma between two parameters of ’limit’ keyword in the selection query.
- Issue: org.apache.ibatis.executor.ExecutorException: A query was run and no Result Maps were found for the Mapped Statement ‘io.github.jiajun2001.community.community.dao.CommentMapper.selectCountByEntity’. It’s likely that neither a Result Type nor a Result Map was specified.
- To address this issue, remember to specify the resultType inside of the SQL label of XML file.
2023-01-04
Transaction Maganement
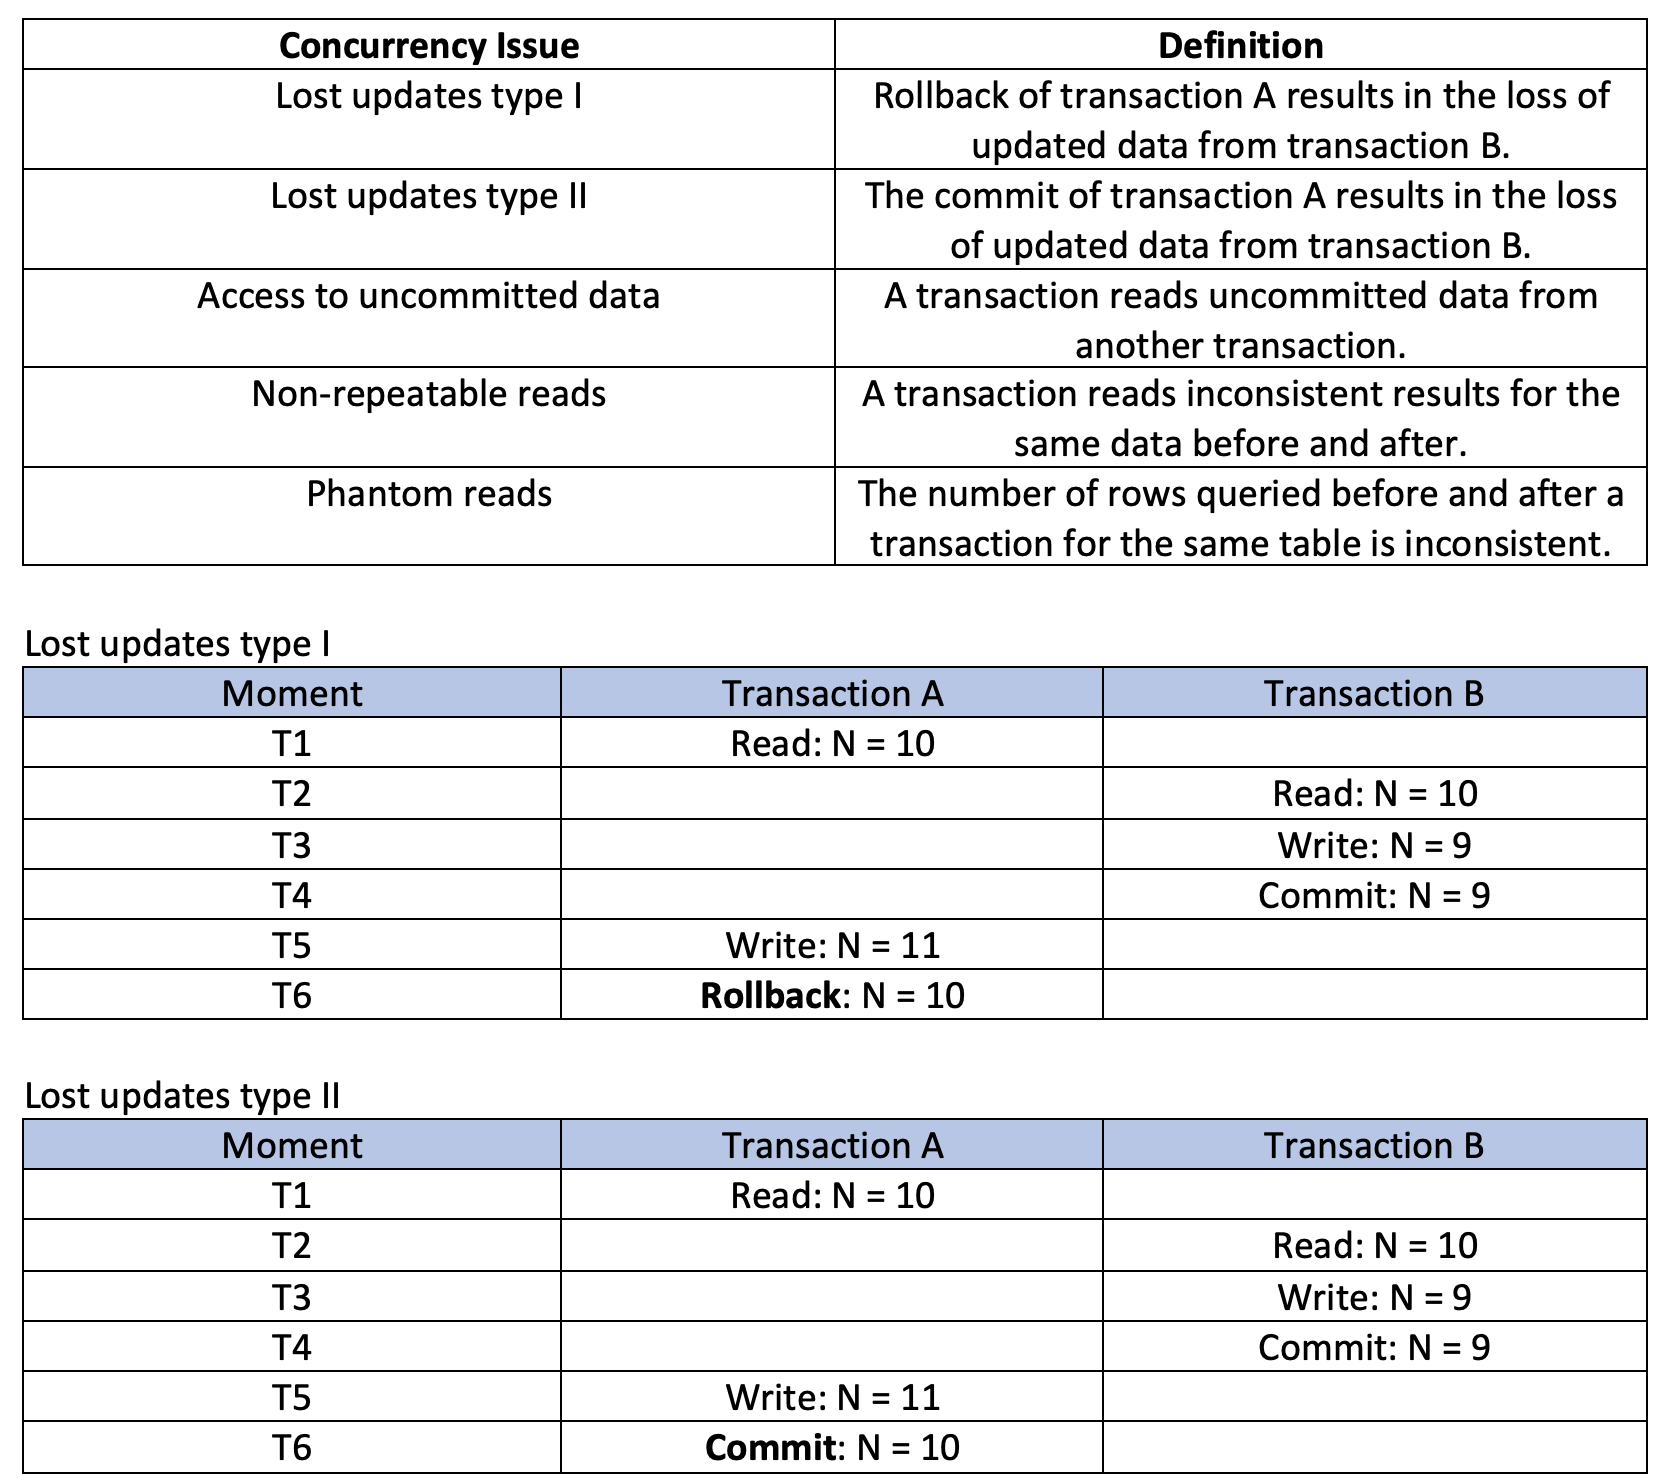
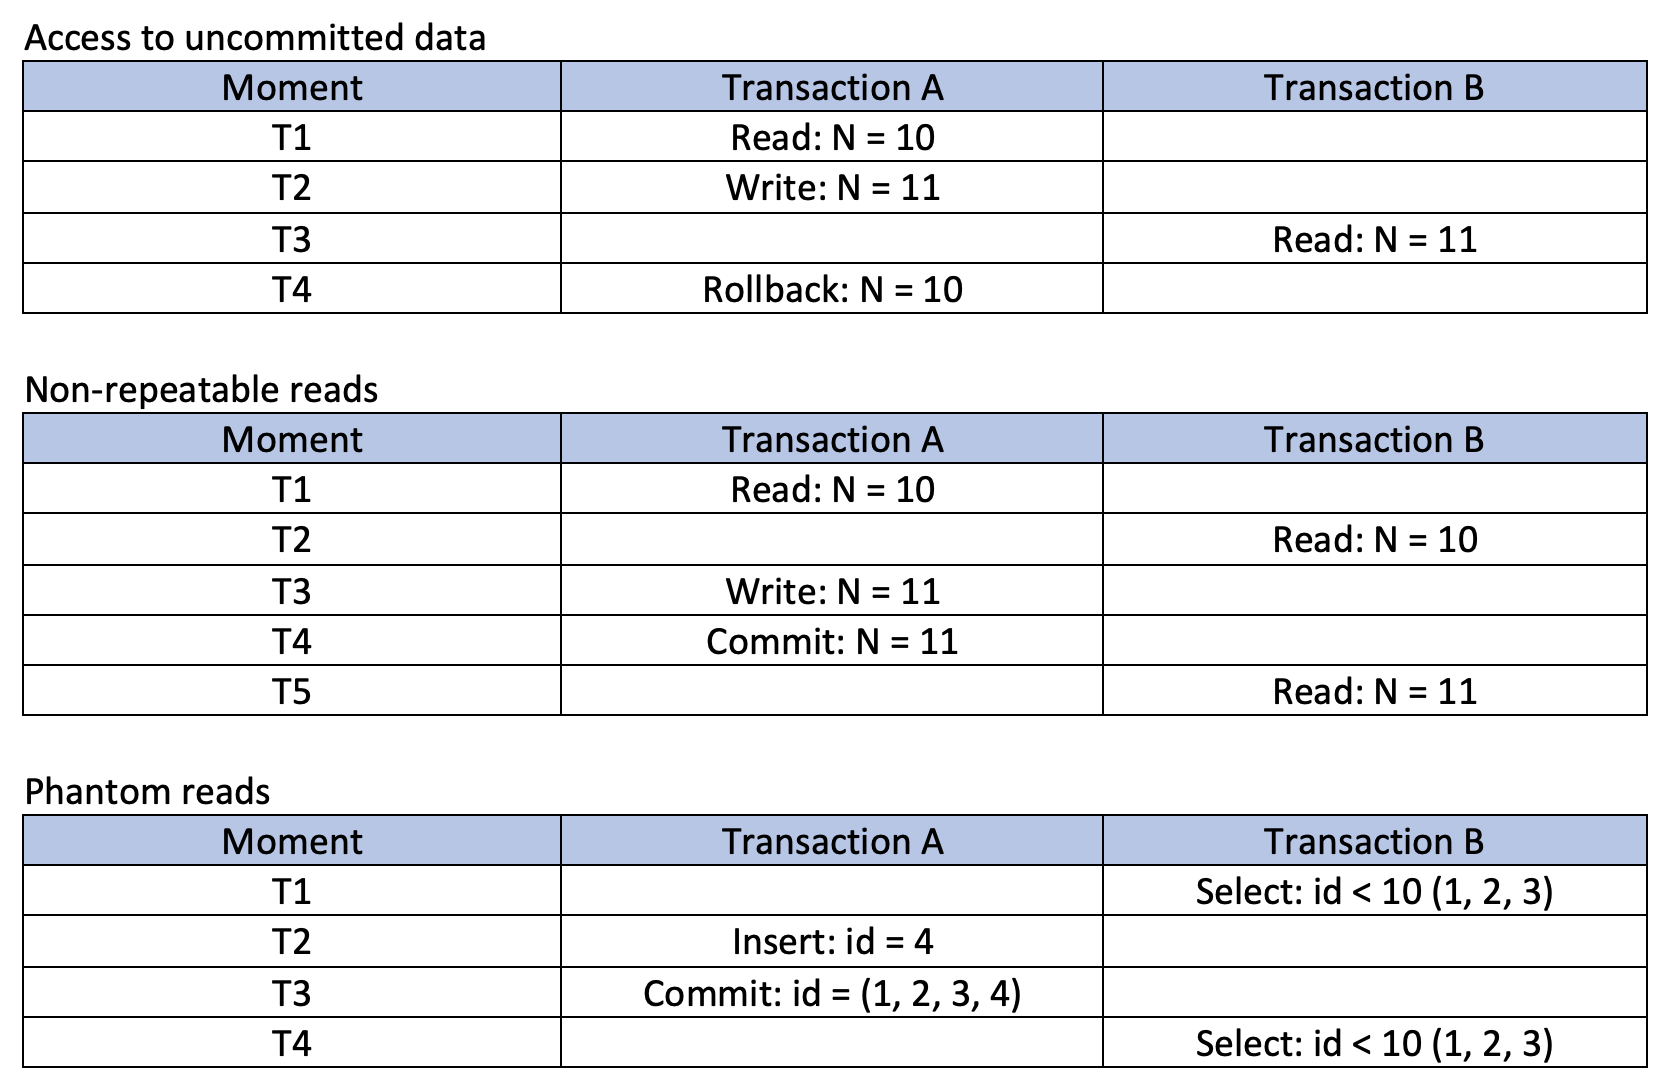
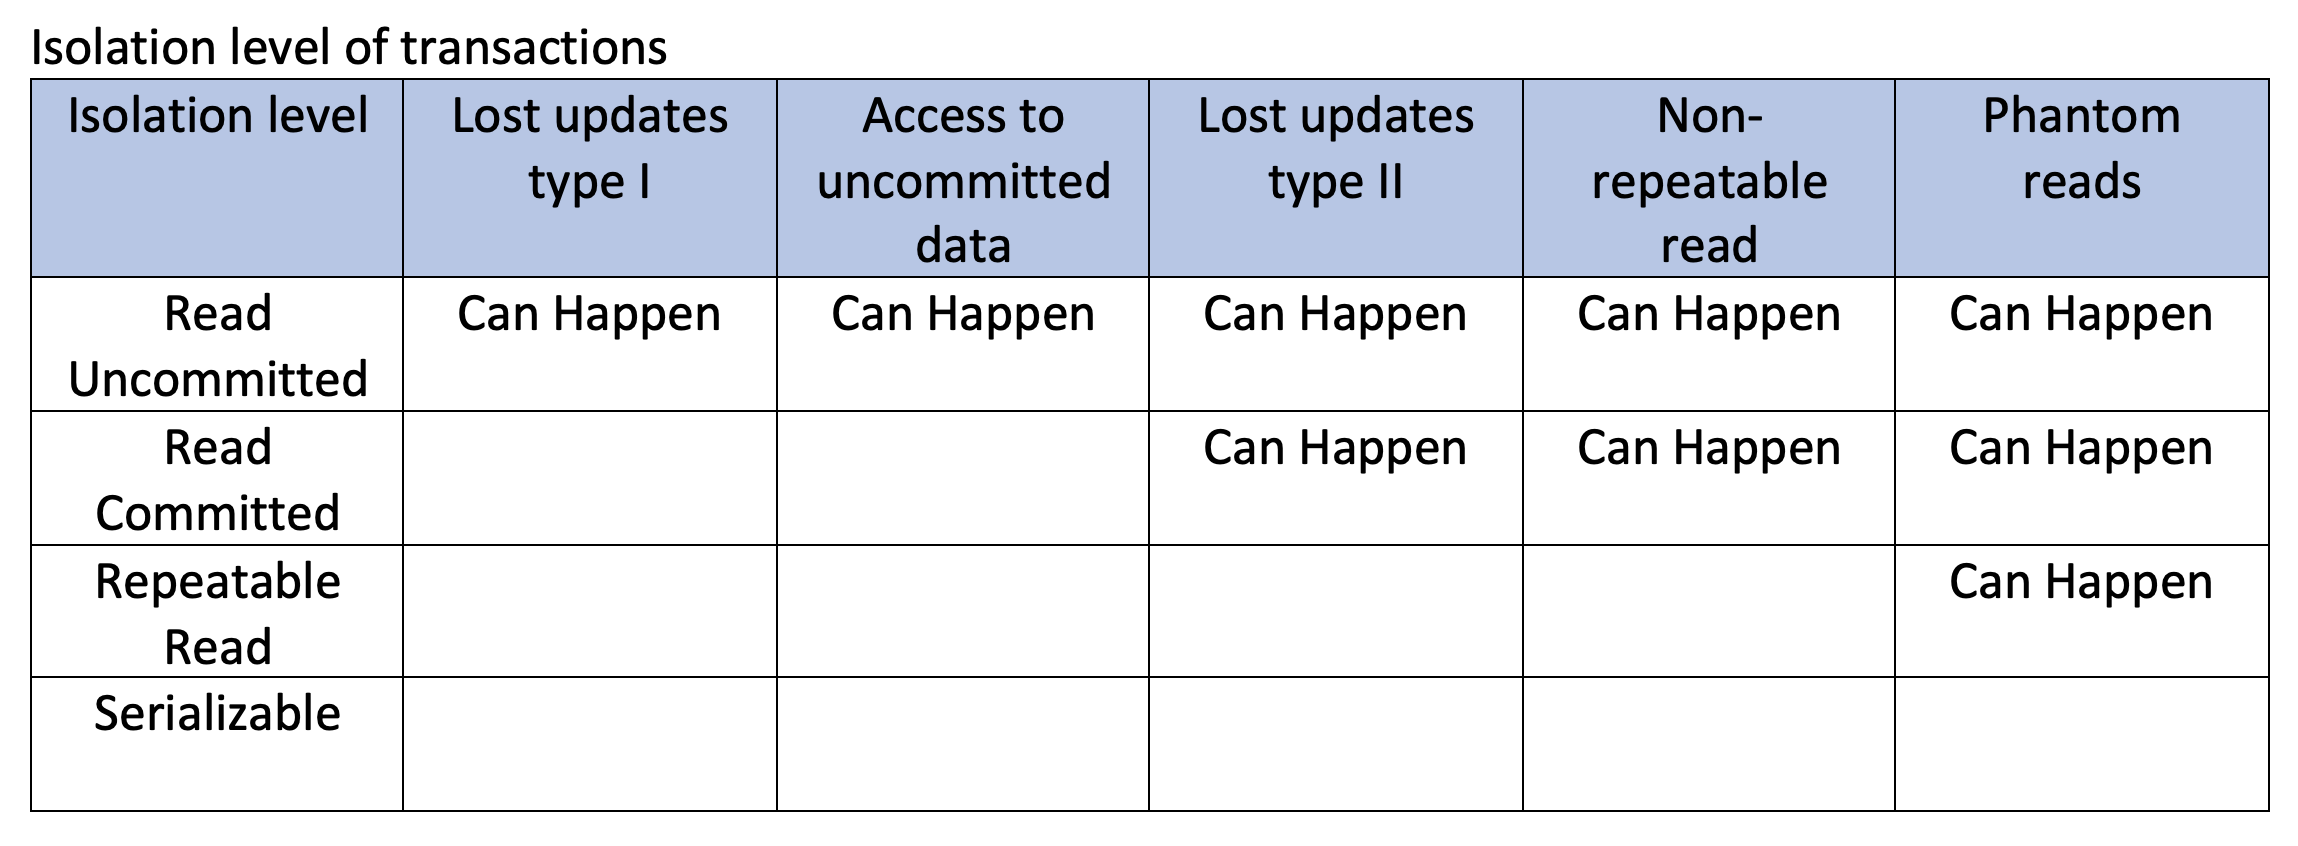
- Transactions are a set of operations used to perform a logical set of work. A transaction usually means that the data in the database has changed. One of the major uses of DBMS is to protect the user’s data from system failures. It is done by ensuring that all the data is restored to a consistent state when the computer is restarted after a crash. The transaction is any one execution of the user program in a DBMS. Executing the same program multiple times will generate multiple transactions.
- ACID Properties are used for maintaining the integrity of database during transaction processing. ACID in DBMS stands for Atomicity, Consistency, Isolation, and Durability.
- Atomicity: A transaction is a single unit of operation. You either execute it entirely or do not execute it at all. There cannot be partial execution.
- Consistency: Once the transaction is executed, it should move from one consistent state to another.
- Isolation: Transaction should be executed in isolation from other transactions (no Locks). During concurrent transaction execution, intermediate transaction results from simultaneously executed transactions should not be made available to each other. (Level 0,1,2,3)
- Durability: · After successful completion of a transaction, the changes in the database should persist. Even in the case of system failures.
-
Mechanism of transaction management
- Lock-based protocols help you to manage the order between the conflicting transactions when they will execute. Timestamp-based protocols manage conflicts as soon as an operation is created.
- Lock-based
- Shared Lock: A shared lock is also called a Read-only lock. With the shared lock, the data item can be shared between transactions. This is because you will never have permission to update data on the data item.
- Exclusive Lock: With the Exclusive Lock, a data item can be read as well as written. This is exclusive and can’t be held concurrently on the same data item. Transactions may unlock the data item after finishing the ‘write’ operation.
- Timestamp-based:
- Timestamp based Protocol in DBMS is an algorithm which uses the System Time or Logical Counter as a timestamp to serialize the execution of concurrent transactions. The Timestamp-based protocol ensures that every conflicting read and write operations are executed in a timestamp order.
-
Two ways of managing transactions
- Declarative Transactions
- Declare the attributes of a transaction for one method using XML configuration
- Using annotation to declare the attributes of a transaction for one method
@Transactional(isolation = Isolation.READ_COMMITTED, propagation = Propagation.REQUIRED) public Object save1() { // Add a new user User user = new User(); user.setUsername("alpha"); user.setSalt(CommunityUtil.generateUUID().substring(0, 5)); user.setPassword(CommunityUtil.md5("123" + user.getSalt())); user.setEmail("alpha@qq.com"); user.setHeaderURL("http://image.newcoder.com/head/99t.png"); user.setCreateTime(new Date()); userMapper.insertUser(user); // Add a new post DiscussPost discussPost = new DiscussPost(); discussPost.setUserId(user.getId()); discussPost.setTitle("Hello"); discussPost.setContent("NEW NEW USER"); discussPost.setCreateTime(new Date()); discussPostMapper.insertDiscussPost(discussPost); // Create an error, see if it can roll back Integer.valueOf("abc"); return "ok"; }- Programmatic Transactions
- Using TransactionTemplate to manage transactions
@Autowired private TransactionTemplate transactionTemplate; public Object save2() { transactionTemplate.setIsolationLevel(TransactionDefinition.ISOLATION_READ_COMMITTED); transactionTemplate.setPropagationBehavior(TransactionDefinition.PROPAGATION_REQUIRED); return transactionTemplate.execute(new TransactionCallback<Object>() { @Override public Object doInTransaction(TransactionStatus status) { // Add a new user User user = new User(); user.setUsername("beta"); user.setSalt(CommunityUtil.generateUUID().substring(0, 5)); user.setPassword(CommunityUtil.md5("123" + user.getSalt())); user.setEmail("beta@qq.com"); user.setHeaderURL("http://image.newcoder.com/head/999t.png"); user.setCreateTime(new Date()); userMapper.insertUser(user); // Add a new post DiscussPost discussPost = new DiscussPost(); discussPost.setUserId(user.getId()); discussPost.setTitle("Hola"); discussPost.setContent("NEW NEW USER USER"); discussPost.setCreateTime(new Date()); discussPostMapper.insertDiscussPost(discussPost); // Create an error, see if it can roll back Integer.valueOf("abc"); return "ok"; } }); } - Declarative Transactions
2023-01-03
View post content
- Add methods to DiscussPostMapper, DiscussPostService, DiscussPostController
- Modify index.html to add links to access the content of posts
- Connect with discuss-detail.html frontend page
Trouble Shooting:
- In the frontend page, make sure using the same attribute names of the model passed from the backend implementation.
2023-01-02
Filter sensitive words
- Make a txt file defining the words that will be filtered
- Define the prefix tree
- Initialize the prefix tree based on words in the txt file defined before
- Develop ‘filter’ method
- If original text is empty, return null
- Define three pointers, two of them iterate through the original text, the other points to the prefix tree.
- Handle symbol characters
- If the prefix tree pointer points to the root node, skip
- Else, move the end pointer one character to skip the symbol
- Check if a word is a sensitive
- If the prefix tree pointer is null, append the character, move ‘begin’ and ’end’ one character back, make the prefix tree pointer point to the root node.
- If we detect a sensitive word, append a filtered word to the string builder, move ’end’ one character back, set ‘begin’ to be ’end’, make the prefix tree pointer point to the root node.
- If we can find the character in the prefix tree and it is not a termination of a sensitive word, move ’end’ one character back.
- Handle the trailing characters because ‘begin’ pointer may not be able to reach to the end
Optimization
- When constructing the prefix tree, convert all English letters to lowercase letters, so that the tool can filter sensitive words no matter if they are uppercase or lowercase.
Posting
- Load fastjson from Maven Repository
- Add insertDiscussPost into DiscussPostMapper
- Add addDiscussPost into DiscussPostService
- Check if discussPost is empty or not
- Filter labels for safety
- Filter sensitive words
- Invoke insertDiscussPost
- Develop DiscussPostController
- Check if there exists a user
- New a DiscussPost entity
- Invoke addDiscussPost
- Using jQuery to send AJAX to render the page without refreshing
2023-01-01 (Happy New Year)
Setting a new profile image
- Access the user setting page
- Modify UserController
- Upload the new profile picture
- Config for the path for storing images
- Create a ‘updateHeader’ method in UserService
- Update headerURL attribute in the database
- Create a ‘updateHeader’ method in UserController
- public String uploadHeader(MultipartFile headerImage, Model model)
- Check the validity of the headerImage
- If it is empty, add attribute to the model and redirect to the same page
- If the suffix of the image is empty, add attribute to the model and redirect to the same page
- Generate a new file name with a randomly generated string
- Find the path of storing the file to the local server
- Store the file to the local server
- Update the path of the headerURL in the database
- Redirect to the home page
- Get the profile picture
- Get the file address of the local server
- Get the suffix of the file
- Set response content type (pass the suffix of the file)
- Use IO to load the image
- Connect with the frontend page
- Add enctype=“multipart/form-data” th:action="@{/user/upload} to form labels
Trouble Shooting:
- To store profile images in the server side, we need to manually create a folder based on the path first.
- In application.properties, when configurating for the path of uploading images, do not put double quotation marks around the path.
Change password
- In UserService side
- Check the validity of three inputs
- If original password, new password and confirmed password are empty or not
- Check if original password is correct or not
- Check if new password is strong enough or not
- Check if new password is identical to confirmed password
- Check if original password is the same as new password
- Check the validity of three inputs
- In UserController side
- Fetch current user in the thread
- Invoke changePassword method from userService
Optimization
- Restrict file types that can be uploaded
- Delete old profile images to reduce the service load
- Compress the image if its size is greater than 0.125 Mb (under construction)
Check login status (Restrict users who have not logged in to access some pages using specific paths)
- Define an user-defined annotation
- Put the annotation before methods that we want to intercept
- Define an interceptor
- Override its preHandle method
- Check if handler is a HandlerMethod or not
- Typecast handler from Object to HandlerMethod
- Get the method from the HandlerMethod
- Find if we can get the specific annotation from the method
- If the method has the specific annotation and the user (from hostHolder) is not logged in
- Redirect the visitor to the login page
- Override its preHandle method
- Config for interceptor
- Exclude the access for static resource
2022-12-31 (Last day of 2022)
Display login information
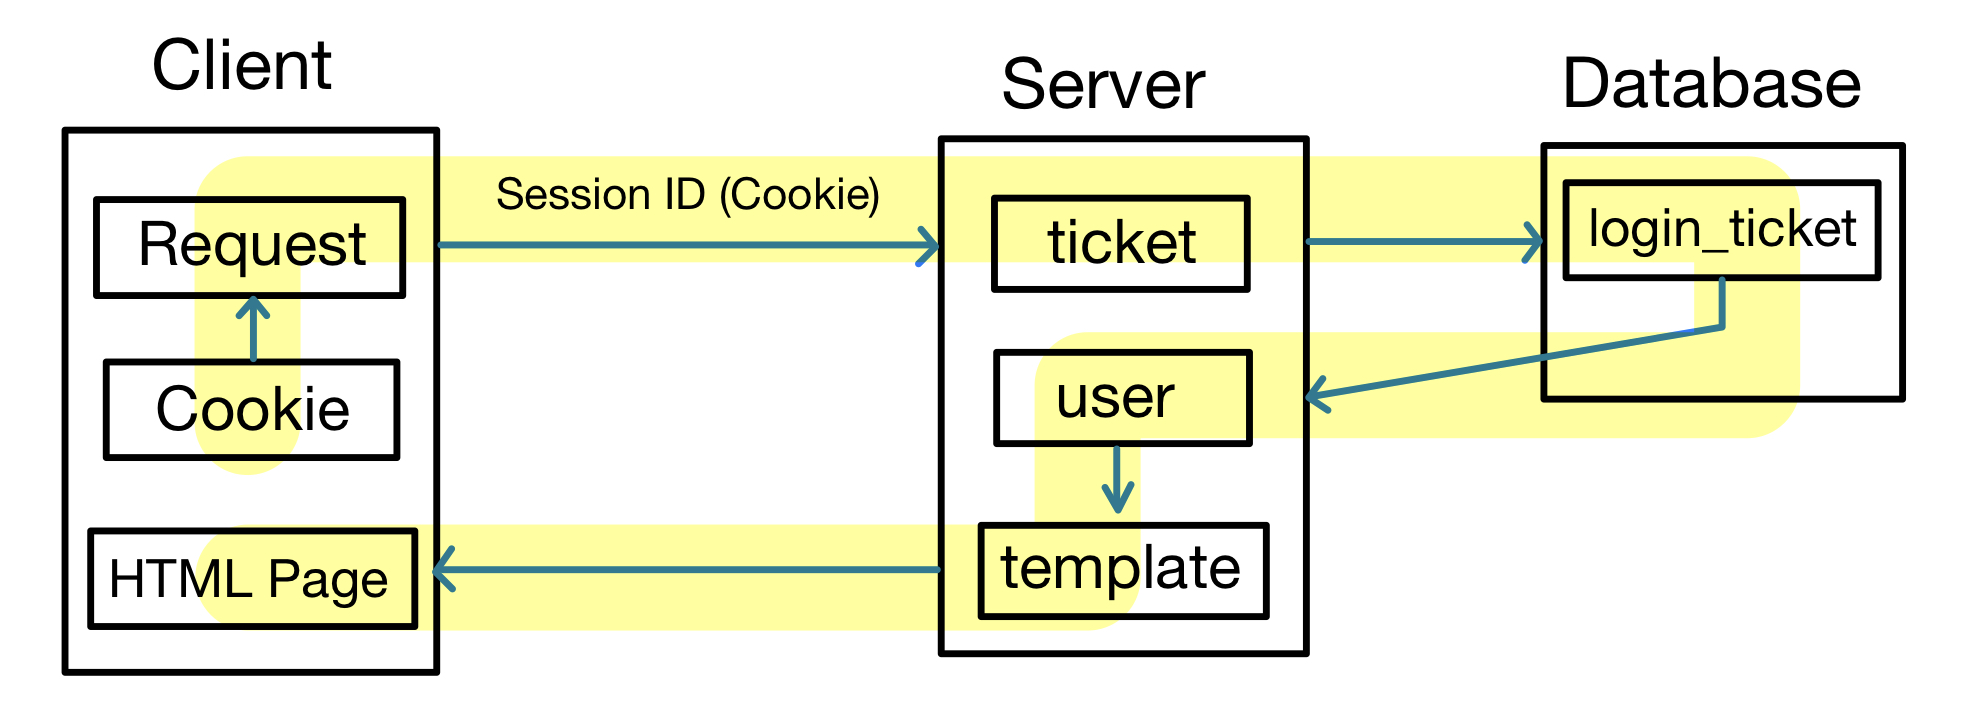
- Define an interceptor to handle logined users (It reduces the coupling of the system.)
- preHandle() method
- Get the cookie of the user
- Use the cookie to get the loginTicket from login_ticket database
- Validate the loginTicket
- if the loginTicket is null or not
- if the status of the loginTicket is 0 (valid) or not
- if the loginTicket is expired or not
- Get the user based on the user_id from the loginTicket
- Hold the user for current thread
- postHandle() method
- Get the user from current thread
- Validate user and modelAndView objects
- Add the user to the model
- afterCompletion() method
- Clear the data
- preHandle() method
- Config for the interceptor
- Connect with the frontend page header
- Based on if the attribute ’loginUser’ is null or not to display some labels
2022-12-30
Login
- Build LoginTicket entity
- Develop UserService to add a login function
- Check empty values
- Username, password
- Check if the account is existed or not
- Check if the account is activated or not
- Check if the password is correct or not
- Encrypt the password and its salt and compare it with the one stored in the database
- Generate a ‘session’ for the user
- Create a LoginTicket object and store it in the database
- Check empty values
- Develop LoginController
- Check captcha
- Check if the captcha from the user and the captcha stored in the session are empty or not
- Ckeck if they are equal or not (Do not distinguish between capital letters or lowercase letters)
- Check account and password
- Set expiredSeconds based on if the user selected ‘Remember me’ checkbox
- Invoke userService.login method and use a map to receive the value
- Based on if the map has the key called ’ticket’, determine the following control logic:
- If the map has the key ’ticket’, set the cookie and redirect the user to the homepage. (Success)
- If the map does not have this key, set attributes to model and stay in the login page. (Fail)
- Check captcha
- Connect with the frontend login page
- Retain old information if login fails
- Set th:text for div labels to display if there are some error messages
- Control ‘is-invalid’ attribute based on the existence of error messages
Logout
- Get the ticket of the user from cookies
- Set the status attribute of the ticket in the database to be 1
- Redirect the user to the login page
- Connect with the frontend page header
2022-12-29
Session Management
Cookie operations
@RequestMapping(path = "/cookie/set", method = RequestMethod.GET)
@ResponseBody
public String setCookie(HttpServletResponse response) {
    // Create cookie
    Cookie cookie = new Cookie("code", CommunityUtil.generateUUID());
    // Set cookie range
    cookie.setPath("/community/alpha");
    // Set cookie existing time (seconds)
    cookie.setMaxAge(60 * 10);
    // Send cookie
    response.addCookie(cookie);
    return "set cookie";
}

@RequestMapping(path = "/cookie/get", method = RequestMethod.GET)
@ResponseBody
public String getCookie(@CookieValue("code") String code) {
    System.out.println(code);
    return "get cookie";
}
Session mechanism
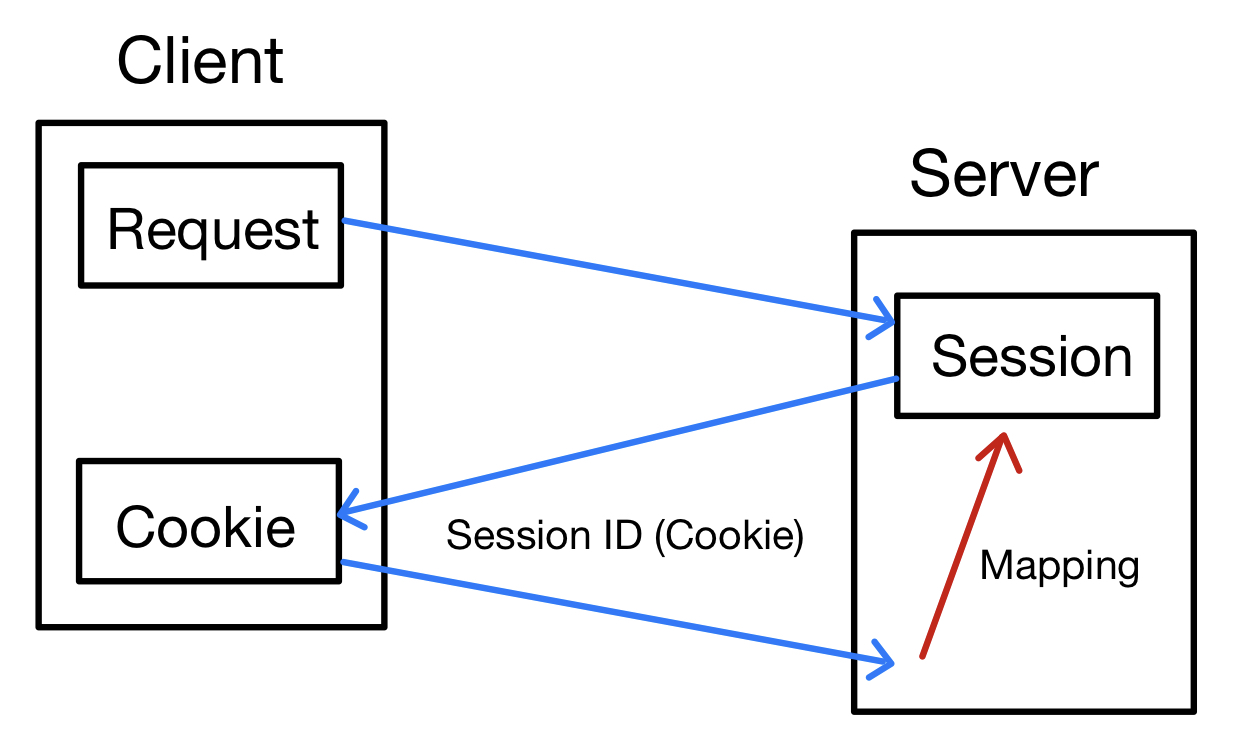 Session operations
@RequestMapping(path = "/session/set", method = RequestMethod.GET)
@ResponseBody
public String setSession(HttpSession session) {
    session.setAttribute("id", 1);
    session.setAttribute("name", "test");
    return "set session";
}

@RequestMapping(path = "/session/get", method = RequestMethod.GET)
@ResponseBody
public String getSession(HttpSession session) {
    System.out.println(session.getAttribute("id"));
    System.out.println(session.getAttribute("name"));
    return "get session";
}
Generate captcha
- Load Kaptcha » 2.3.2 from Maven Repository
- Config for this module manually
@Configuration
public class KaptchaConfig {
    @Bean
    public Producer kaptchaProducer() {
        Properties properties = new Properties();
        properties.setProperty("kaptcha.image.width", "100");
        properties.setProperty("kaptcha.image.height", "40");
        properties.setProperty("kaptcha.textproducer.font.size", "32");
        properties.setProperty("kaptcha.textproducer.font.color", "0,0,0");
        properties.setProperty("kaptcha.textproducer.char.string", "0123456789abcdefghijklmnopqrstuvwxyz");
        properties.setProperty("kaptcha.textproducer.char.length", "4");
        properties.setProperty("kaptcha.noise.impl", "com.google.code.kaptcha.impl.NoNoise");

        DefaultKaptcha kaptcha = new DefaultKaptcha();
        Config config = new Config(properties);
        kaptcha.setConfig(config);
        return kaptcha;
    }
}
- Inside of LoginController, define a method called ‘getKaptcha’
- Use kaptchaProcuder.createText() to generate a kaptcha text
- Use the text to generate a kaptcha image
- Store the text into the session for future verification
- In login page, set the src attribute of img tag to be the path of getKaptcha
2022-12-28
Sign-up module
- Clicking sign up button redirects the user to the page for signing up
- Using form to submit data
- Server verifies the validation of submitted data
- If account, password, email are empty or not
- If the account is existed or not
- If the email is existed or not
- Create a new user
- Generate a random salt for password
- Use md5 to encrypt the password + salt and set this attribute
- Set some attributes for this user
- type, status, activation code, headerURL, createTime
- Insert the user into database
- Server sends verification emails
- Set the activation URL for the email
- Feed this variable into the template
- Send the verification email
- Activate the account
- Clicking the link in the verification email
- LoginController will process the link
- Invoke the ‘activate’ method from UserService
- Based on the code returned by UserService to generate operate-result.html
- Redirect to another page according to the activation result
2022-12-27
Sending email
- Open the SMTP service of your email account
- Load Spring Boot Starter Mail from Maven Repository
- Config MailProperties
spring.mail.host = smtp.sina.com
spring.mail.port = 465
spring.mail.username = xxxxx
spring.mail.password = xxxxx
spring.mail.protocal = smtps
spring.mail.properties.mail.smtp.ssl.enable = true
- Using MimeMessageHelper to assemble MimeMessage, and then invoke the method of mailSender.send(helper.getMimeMessage());
Trouble Shooting:
- org.springframework.mail.MailAuthenticationException: Authentication failed
- This issue is caused by entering the wrong spring.mail.password in application.properties file. Note, you cannot fill in your email login password if you get an authentication code after setting up SMTP service of your email client side. Please fill in that property by the code you get.
2022-12-26
Page selection
- When a new page index is clicked, a new page’s link will be generated (href).
- This link will be parsed by HomeController and the ‘current’ value will be fetched and passed to the page entity.
- HomeController will get the post data and package them for thymeleaf view template to render.
2022-12-25 (Merry Christmas!)
Home Page
- Build entity file -> Build mapper file -> Build XML file
Trouble Shooting:
- Do not put extra comma in SQL
- e.g. order by type desc, create_time desc, (wrong)
- Make sure @Param(xx) matches to xx
- e.g. int selectDiscussPostRows(@Param(“usedId”) int userId); (wrong)
- Remember to add the attribute to the model in controller files
- When using thymeleaf inside of html labels, make sure you only type one ‘{’ because of auto complete.
<a href="#" th:utext="${map.post.title}}"></a>(Wrong)
- Another bug that I have met today is: Caused by: org.attoparser.ParseException when I was using thymeleaf engine to generate the content of the home page. This bug took me 3 hours to solve.
- By analysis, this exception is caused by thymeleaf cannot get the object and therefore cannot parse it.
- Since this exception happened to ${map.user.headerURL} attribute, then I went to check my entity and realized that the getter and setter methods had wrong function names. I am not sure what caused this issue, because these getter and setter methods were generated by IntelliJ IDEA, but after modifying it, the application worked.
- Issue: public String getheaderURL() –> public String getHeaderURL()
2022-12-24
MyBatis
MyBatis is an open source, lightweight, persistence framework. It is an alternative to JDBC and Hibernate. It automates the mapping between SQL databases and objects in Java, NET, and Ruby on Rails.
- Load MySQL Connector Java from Maven Repository
- Load MyBatis Spring Boot Starter from Maven Repository
- Create an entity file (A Java class) under the entity folder
- It contains attributes of database columns, getter and setter methods, and toString method.
- Create a mapper file (A Java interface) under the dao (Data Access Object) folder
- It contains methods for interfacing with the database
- E.g. User selectById(int id); int updateHeader(int id, String headerUrl);
- Create a XML file under resources/mapper folder
- Basic Structure:
    <?xml version="1.0" encoding="UTF-8" ?>
        <!DOCTYPE mapper
        PUBLIC "-//mybatis.org//DTD Mapper 3.0//EN"
        "https://mybatis.org/dtd/mybatis-3-mapper.dtd">
        <mapper namespace="org.mybatis.example.BlogMapper">
        <select id="selectBlog" resultType="Blog">
            // SQL.....
        </select>
    </mapper>
Trouble Shooting:
- If you encounter “MySQL ERROR 1045 (28000): Access denied for user ‘root’@’localhost’ (using password:YES)” on Mac. Try to go to System Settings and find MySQL at the bottom of the left sidebar. Try to Initialize Database and set a new password.
- For me, I had a problem of running tests for my mapper file. And then I found in my entity file, there was a typo of typing ‘Date’ as ‘Data’ which caused a wrong import of packages. (You need to be careful! This kind of bug will cause you tons of hours to debug because the terminal will just throw you a bunch of warning and error information.)
- Please make sure the parameters of function signature in the mapper file match to the contents inside of the XML file labels.
2022-12-23
Spring IoC
- Inversion of Control <- Dependency Injection <- IoC Container
- When a Spring container is created, it will automatically scan beans from different packages and assemble them into the container.
- Classes with @Controller @Service @Component @Repository will be scanned by the container.
- Advantage: Beans will rely on an interface instead of a particular implementing class.
    @Autowired
	@Qualifier("alphaHibernate")
	private AlphaDao alphaDao;

	@Autowired
	private AlphaService alphaService;

	@Autowired
	private SimpleDateFormat simpleDateFormat;

	@Test
	public void testDI() {
		System.out.println(alphaDao);
		System.out.println(alphaService);
		System.out.println(simpleDateFormat.format(new Date()));
	}
    /*
    io.github.jiajun2001.community.community.dao.AlphaDaoHibernateImpl@5e9bbd9d
    io.github.jiajun2001.community.community.service.AlphaService@4b87074a
    2022-12-23 14:08:20
    */
Spring MVC
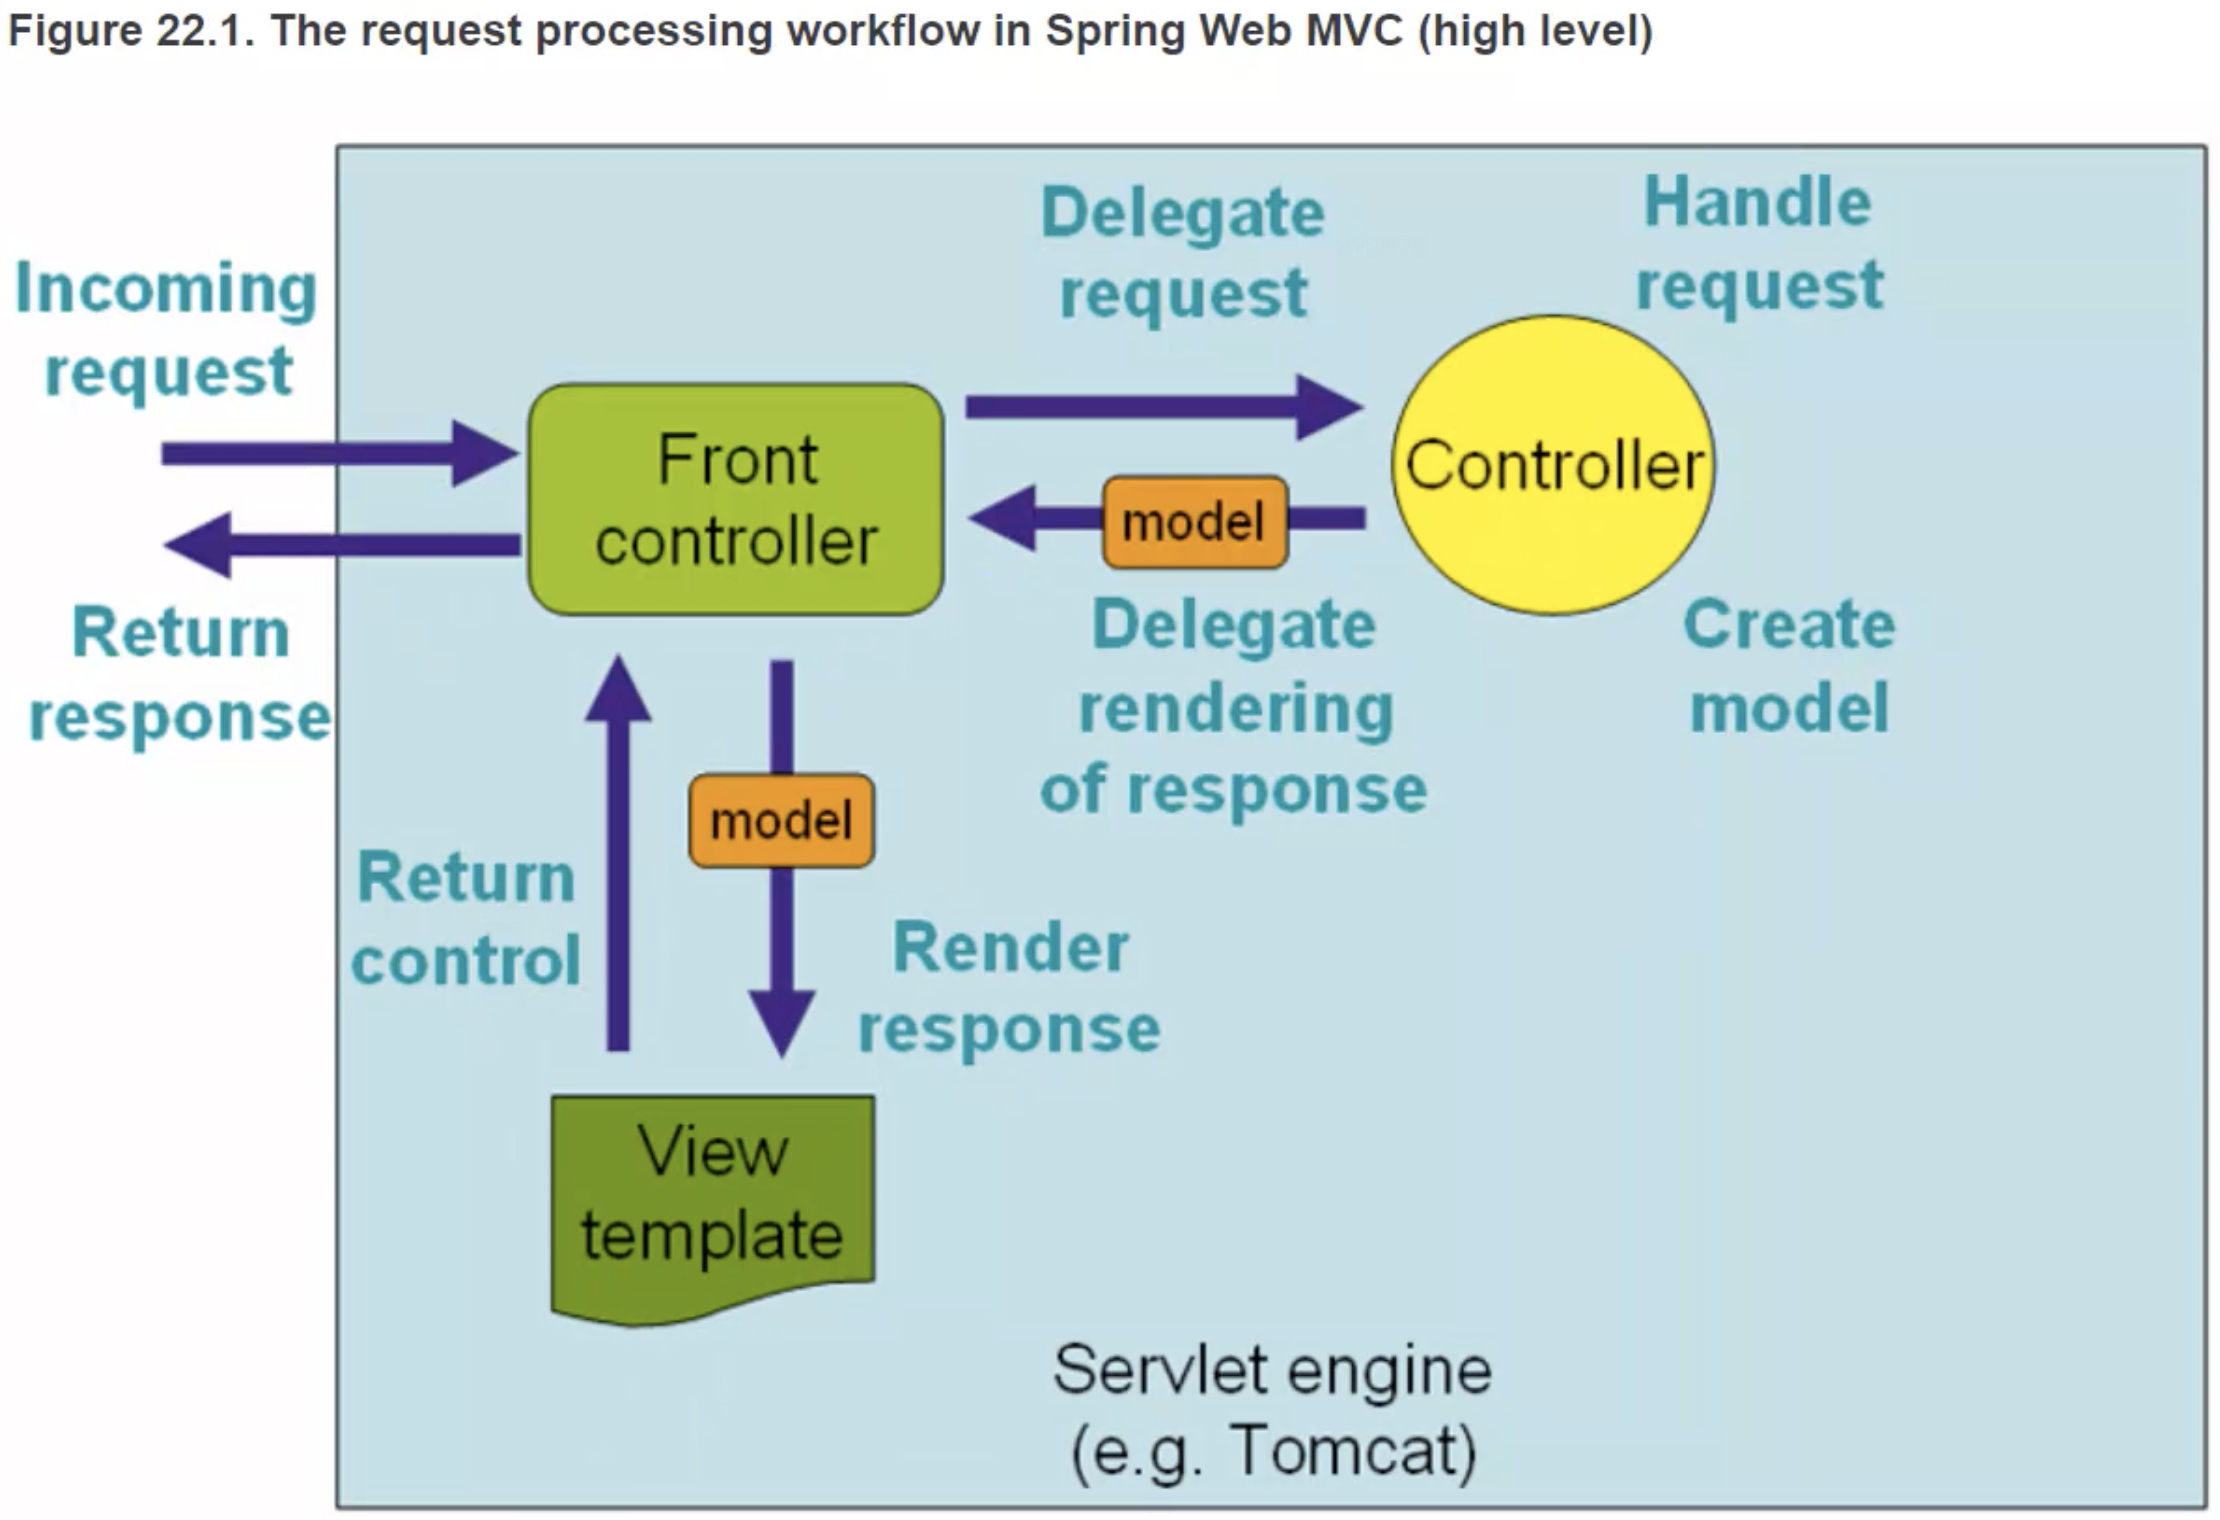
Spring MVC is a library within the Spring framework that simplifies handling HTTP requests and responses. It’s built on the Servlet API and is an essential component of the Spring Framework. The MVC stands for Model-View-Controller, which is its core function, allowing separation of the business logic, presentation logic, and navigation logic.
Two ways of passing parameters into GET request
// /students?current=1&limit=20
@RequestMapping(path = "/students", method = RequestMethod.GET)
@ResponseBody
public String getStudents(
        @RequestParam(name = "current", required = false, defaultValue = "1") int current,
        @RequestParam(name = "limit", required = false, defaultValue = "10") int limit) {
    System.out.println("Current: " + current);
    System.out.println("Limit: " + limit);
    return "Some students!";
}

// /student/123
@RequestMapping(path = "/student/{id}", method = RequestMethod.GET)
@ResponseBody
public String getStudent(@PathVariable("id") int id) {
    System.out.println("ID: " + id);
    return "a student!";
}
Passing parameters into POST request
<form method="post" action="/community/alpha/student">
    <p>
        Name: <input type="text" name="name">
    </p>
    <p>
        Age: <input type="text" name="age">
    </p>
    <p>
        <input type="submit" value="Save">
    </p>
</form>
@RequestMapping(path = "/student", method = RequestMethod.POST)
@ResponseBody
public String saveStudent(String name, int age) {
    System.out.println("Name: " + name);
    System.out.println("Age: " + age);
    return "Success";
}
Trouble Shooting:
- If you click the button and it does not respond. Go back to your HTML file and check if the type of the button is ‘submit’ instead of ‘button’.
Two ways of responding HTML page
<!DOCTYPE html>
<html lang="en" xmlns:th="http:www.thymeleaf.org">
<head>
    <meta charset="UTF-8">
    <title>Teacher</title>
</head>
<body>
    <p th:text="${name}"></p>
    <p th:text="${age}"></p>
</body>
</html>
@RequestMapping(path = "/teacher" ,method = RequestMethod.GET)
public ModelAndView getTeacher() {
    ModelAndView mav = new ModelAndView();
    mav.addObject("name", "Jason");
    mav.addObject("age", 21);
    mav.setViewName("/demo/view");
    return mav;
}

@RequestMapping(path = "/school", method = RequestMethod.GET)
public String getSchool(Model model) {
    model.addAttribute("name", "Adelaide Uni");
    model.addAttribute("age", 100);
    return "/demo/view";
}
Two ways of responding JSON format data
@RequestMapping(path = "/emp", method = RequestMethod.GET)
@ResponseBody
public Map<String, Object> getEmp() {
    Map<String, Object> emp = new HashMap<>();
    emp.put("name", "Jason");
    emp.put("age", 21);
    emp.put("salary", 200000);
    return emp;
}
// {"name":"Jason","salary":200000,"age":21}

@RequestMapping(path = "/emps", method = RequestMethod.GET)
@ResponseBody
public List<Map<String, Object>> getEmps() {
    List<Map<String, Object>> list = new ArrayList<>();
    Map<String, Object> emp1 = new HashMap<>();
    emp1.put("name", "Jason");
    emp1.put("age", 21);
    emp1.put("salary", 200000);
    list.add(emp1);

    Map<String, Object> emp2 = new HashMap<>();
    emp2.put("name", "Kevin");
    emp2.put("age", 20);
    emp2.put("salary", 190000);
    list.add(emp2);
    return list;
}
// [{"name":"Jason","salary":200000,"age":21},{"name":"Kevin","salary":190000,"age":20}]
2022-12-22
Download and config Apache Maven
Apache Maven is a software project management and comprehension tool. Based on the concept of a project object model (POM), Maven can manage a project’s build, reporting and documentation from a central piece of information.
- Go to the website of Maven: https://maven.apache.org/download.cgi
- Choose the version of Maven to download:
- For Mac users: apache-maven-3.8.6-bin.tar.gz
- For Windows users: apache-maven-3.8.6-bin.zip
- Unzip the compressed file
- Set the environment path: e.g. export PATH=/Users/apple/apache-maven-3.8.6/bin:$PATH
- Config the mirror repository:
- conf -> settings.xml
<mirror> <id>alimaven</id> <mirrorOf>central</mirrorOf> <name>aliyun maven</name> <url>https://maven.aliyun.com/repository/central</url> </mirror> - Test by entering the command: mvn --version
- Config IntelliJ IDEA CE for using Maven
- Open IntelliJ IDEA CE
- Preferences -> Build, Execution, Deployment -> Build Tools -> Maven
- Set Maven home path
- Override User setting file, after specifying the path of settings.xml file of your downloaded Maven folder
- Apply -> OK
Using Spring Initializr
Spring Initializr is a web-based tool provided by the Pivotal Web Service. With the help of Spring Initializr, we can easily generate the structure of the Spring Boot Project. It offers extensible API for creating JVM-based projects.
Trouble Shooting:
- If the spring boot project does not run. Go to preference -> Build, Execution, Deployment -> Build Tools -> Maven. Set the Maven home path to Bundled (Maven 3). And then click apply and ok.